A website QR code lets someone open a page without typing a long address. The technical process is simple, but a professional result requires more than pasting a URL and downloading an image. You need to verify the destination, choose the right QR type, preserve scan contrast, select an appropriate file format and test the code in the environment where it will be used. This guide covers the full workflow from preparing the URL to placing the final code on print or digital material.
Prepare the final destination URL
Open the exact page you want visitors to reach and copy the full secure address, including https://. Remove accidental spaces and decide whether campaign parameters are required. If the page redirects several times, consider linking to the final stable URL you control.
Test the page on a phone before making the QR code. A scan usually happens on mobile, so slow loading, tiny text, intrusive pop-ups or a broken layout will create a poor experience even if the code itself scans perfectly.
Original URL workflow test
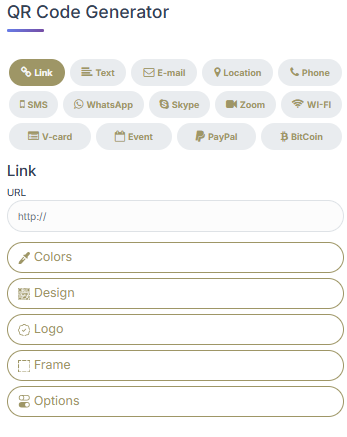
The screenshot used for this guide was captured from the Link QR workflow in ZaitoonBites. It shows the URL field, QR type selector and customization sections that should be checked before downloading a website QR code.
| Test step | What was checked | Why it matters |
|---|---|---|
| URL field | The destination starts with a usable web address format. | A wrong or incomplete URL can still create a QR image, but it will not give the user a useful result. |
| Type selector | The Link option is selected for a normal website destination. | Choosing the correct QR type keeps the workflow clear and avoids unnecessary fields. |
| Preview stage | The generated output is reviewed before download. | Preview checks reduce the chance of printing the wrong destination. |
Choose the URL or Link QR type
In the generator, choose the Link or URL option and paste the destination exactly. If the tool provides a live preview, confirm that the encoded value matches your intended URL. Avoid shortening the link through an unknown service merely to make the pattern look simpler.
For a static code, remember that the encoded URL cannot be changed after printing. If the destination is likely to change, either use a stable redirect path on a domain you control or evaluate a reputable dynamic solution.
Customize colors safely
Brand colors can make the code fit a design, but scanning should remain the priority. Use a strong contrast between modules and background, and keep the quiet zone clear. Dark foreground colors on a light background are the safest starting point.
If you use a gradient, test both ends of the gradient for sufficient contrast. Avoid transparent backgrounds over photography unless you have verified the final layout. Decorative frames should sit outside the required clear margin.
Add a logo carefully
A centered logo can improve recognition, but it hides part of the QR pattern. Start with a small logo, preserve the finder patterns and use enough surrounding separation so the mark does not visually merge with the modules.
Scan the code again after every significant logo-size change. Do not rely on error correction as a reason to cover large portions of the code. The goal is a branded code that remains fast to recognize on a variety of phones.
Choose PNG, SVG or PDF
PNG is convenient for websites, presentations and office documents. SVG is a vector format and is usually the best choice when a designer needs to scale the code for posters, packaging or other print work. PDF can be useful in print-oriented workflows.
Choose the format based on the final production process. A large raster image can still become soft if resized incorrectly, while a vector file can preserve sharp module edges at different sizes.
Test the actual scan journey
Scan the code from a real phone and confirm that the browser opens the exact page. Check page title, SSL security, mobile layout and load time. If the destination requires sign-in, make sure users understand that before they scan.
Repeat the test after the QR code is placed into the final artwork. Resizing, compression, color conversion and printing can all affect readability.
Place it with a clear call to action
Tell people what the code does. “View product details”, “Open registration page” or “See full menu” is more useful than an unlabeled QR image. A short instruction reduces uncertainty and makes the scan feel intentional.
Leave enough physical space around the code and avoid putting it near folds, cutting lines or highly reflective areas. The best location is one that a user can comfortably point a phone at for a second or two.
Final publishing checklist
Verify the URL, test multiple phones, confirm sufficient contrast, preserve the quiet zone, select the correct file format and scan a final proof. Keep control of the destination so the page can remain available for the lifetime of the printed material.
If the QR code is part of a campaign, document the destination and publication date. That makes it easier to audit old materials later and prevents customers from being sent to expired pages.
Create and test your QR code
Use the generator, then apply the practical checks from this guide before you publish or print.
Open QR Generator